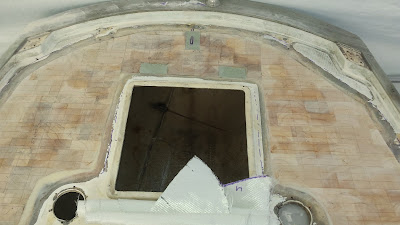
The re-coring of the lazarette continues.It has been a lot of work but also a great learning experience. It takes great deal of courage to make that first cut into a fiberglass deck. I was very green at the start and I still have a lot to learn, but now I am starting to see it all come back together. Knowing what to expect will help the rest of the deck re-coring move along a bit more quickly. As of today I have the third and final layer of 1708 biaxial cloth laid. The deck can now bear weight. Below are photos of various building stages of the lazarette deck.
After I had installed the new balsa core I still had some sanding to do to get the edges of the balsa level with the edges of the old deck. You can see in the above photo there are lighter areas along the wood, This is where it is sanded to make everything flush.
After the sanding of the balsa core I began cutting the new 1708 biaxial fiberglass. I used the balsa paper templates and laid them out over the fiberglass. I cut the fiberglass 2 inches wider than the template to overlap the beveled edges of the old deck. This 2 inches provides the bond between the old and new deck surfaces
After laying on the the 1708 fiberglass, I used a special roller to get the air bubbles out. This was very time consuming. I rolled each piece out for about 10-15 min. Once that was complete, I cut the second layer of fiberglass. I wanted to get 2 layers on.
Here you can see the second layer in place. I made this piece out of one single swath of fabric. I did this because the first layer was made from 3 separate pieces, so having one contiguous second layer will add to the overall strength of deck.
You can see the fiberglass cloth is still white in this photo, before it has been saturated with epoxy resin.
This is the result of one afternoon of glass work. You can see the fiberglass had become translucent from being saturated with resin and all air pockets are removed.
A few days later I broke out the trusty Bosch orbital sander and armed it with 36 grit disc. I began fairing in the edges of the old deck with the newly laid fiberglass. After I had all the edges sanded I moved to the second layer of glass, knocking down any extreme high spots and giving it an all-over good sanding in preparation for the third and final layer of 1708 cloth.
On this day the overnight temps had gotten down into the 40s. I needed to wait until temperatures came up to at least 55 degrees before I began laying any epoxy. In the meantime to help the epoxy along, I brought out an electric skillet. I set it to about 200 degrees, and after about 30 mins and some gentle shaking the epoxy was warmed up and ready.
Before starting I tagged the second layer
The 3rd and final layer of 1708 biaxial cloth. After I finished laying in the last of it, I let the area set up while I went and ate a good lunch the first mate had cooked up. During that time the epoxy became tacky. This was the perfect time to add first layer fairing, so it would bond with the tacky epoxy already on deck and fill in the weave of the fiberglass cloth. Sorry I don't have any pictures of the area before adding the West Systems 407 fairing; my hands were quite sticky.
Just a skim coat of the fairing epoxy on most of the deck area. I also made sure to keep marking the spot for the chainplate as I did each layer.
Another angle of the port side lazarette. I am really happy how the last and final layer finished up. I still have lots of fairing and finishing work to make it look all pretty and smart but I'm quite proud of how it has turned out so far.
I want to thank James Baldwin of Atomvoyages.com, Matt B. of Alberg35.com and Neil R. of berhia.wordpress.com. You guys talked me through this process and helped tremendously. I learned a lot on this small area of the boat and feel confident I can tackle the rest of the decks.
Happy Thanksgiving!!


Looking good!
ReplyDeleteVery nicely done.
ReplyDeleteGreat work and determination son...looks like a ton of work but all worth it...love you xoxo
ReplyDeleteThat's looking really good. Nice idea on having one layer a continuous piece of fiberglass. All the hard work now will allow you to reap the benefits of later.
ReplyDeleteAmazing work!!
ReplyDeleteAwesome, no stopping you now.
ReplyDeleteSimply wish to say your article is as astonishing. The clarity in your post is simply great, and I could assume you are an expert on this subject. Same as your blog i found another one Sohman Epoxy .Actually I was looking for the same information on internet for
ReplyDeleteEpoxy solvent and came across your blog. I am impressed by the information that you have on this blog. Thanks a million and please keep up the gratifying work.