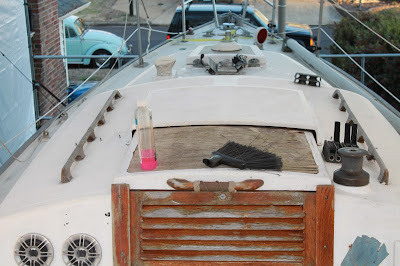
It has been very hot and humid here lately; and so I have not had the drive to go outside after work to get anything done on Sal. Although last Sunday I did wash her down. Her once-white decks were a dark shade of blue from all the boat sanding. After that I scrubbed the bottom of the the boat with just plain water and a scrub brush. I did this to rinse the sanding dust and to get a good visual of what has to repaired now that the paint is gone.
With all of the paint removed from the bottom of the boat it is now time to begin preparations for the repair of the hull imperfections. I am not 100% convinced that what I originally thought were blisters are indeed actually blisters. The more I look at her bottom and the affected area it looks to me like all the little voids are just air pockets from poor lay-up of gelcoat. This was pointed out to me by a blog follower (thank you, Ariel CD36 ) . I believe he may be correct. Does this make it any better? Well...no not really. All these little holes have to be filled and sealed. Let the repair process begin!
Most of the small pin holes are in the dark shaded areas you see in the picture above.
Here is a close up of an affected area...all those tiny dark spots are pin-sized holes, though some are large enough to see fiberglass laminate in them.
My plan is to drill each one of those pin holes with a broad countersink bit. This picture shows the one I've been using. I will drill in about 1/8 of an inch to open up the pin hole enough to get any contaminates out and make it large enough to make a good fill area for the epoxy filler.
Here is the same area after I hit each of those pin holes with the countersink bit creating an open dimple in the gelcoat. You can see it opens up the pin hole quite nicely and provides a good large surface for the epoxy to adhere to. This is only one small area, maybe 4" x 4". I have been doing this to the bottom for a week now and only have a very small portion completed. It's going to take a while.
In the meantime I have started to turn some attention to the decks. I have to remove all the fittings, hatches, railings ......you name it, it has to come off to begin deck repairs.
First item off was the seahood above the sliding companionway hatch (you can see it in place in the deck picture above). This seahood hatch protects her cabin from sea spray and ultimately keeps water out of the boat.
Next on the chopping block are these lovely speakers some previous captain decided needed to go right here.
They cut 4-inch holes in the boat to install these. ??...!!
I'll be kind and assume they just liked music more than they cared about the boat. Everyone has different preferences.
As the summer rolls along I am trying to finish some other side projects that are going to bring in some refit money. I wish I could spend more time on the boat but with the heat and humidity lately, progress will be slow for probably another month.


a thought on the speakers...
ReplyDeleteMaybe (just maybe) keep one of them... if you have your VHF radio inside the cabin, an exterior speaker for the VHF might help to hear what's going on (?).
It's just an idea, But at least THOSE speakers really need to go. Ugly little buggers.
I'm working on a Pearson Ensign with a group of students and it has a bottom like your A30. For some reason the extra thick layup of gelcoat on these older boats causes chunks of gelcoat to "pop" off, leaving little dimples similar to the surface of a golf ball. We made the decision with the Ensign to sand all of the loose, flaking gelcoat off, then fill, fair, and lay a thin layer of fiberglass cloth over the hull before fairing again. A LOT of labor, to be sure. Your situation doesn't look as serious as the Ensign from the pics. Localized filling and fairing, as it sounds like you're going to do, will hopefully work, provided all the loose stuff is removed.
ReplyDeleteBest of luck!