Saturday, August 29, 2015

Alberg 30 refit: Formulating a plan and gathering supplies

Summer is winding down, I am finishing up a few side projects and soon the very serious refit work will begin. This week I began to formulate a plan of attack for Salacia's topsides. I spoke with a few people throughout the week for some guidance on how and where to begin (thank you James, Neil , Matt and John). I always like to get different perspectives on how to approach things...especially things I am not 100% familiar with (e.g. fiberglass boat deck repair.) 
After speaking with these guys, I have come up with a plan. 
I will first attack the re-coring of our Alberg 30's deck. This will be a very time-consuming job. I will add many improvements to the coring so hopefully this will be a once-in-my-lifetime job. I will add some structural support at the mast base throughout the deck, especially where the deck will see heavy forces applied to it.  
I am hoping to get started on it in the coming weeks.

I have to keep looking at the great pictures of our time sailing Sal to remind me why I am doing this!

Approximately two years ago her decks looked 1000% better than they do today.

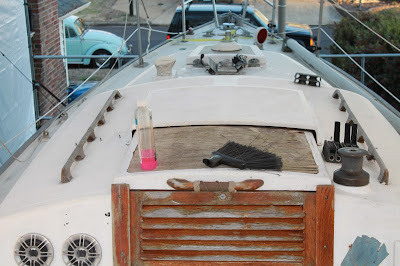
This was taken this afternoon. We now have about 90% of her decks stripped of fitting, nuts and bolts. By next week we should be at 99.9% 

Removed the inner jib tracks, and I was amazed at just how easily these came off. I figured they'd put up more of a fight, but I'm thankful they didn't. They were so easily removed that I can now see how water had penetrated the bolts and holes in the deck to saturate her deck core. 
I am sure this is the first time these tracks have been removed in all of Sal's 44 years.


The gathering of supplies:
I have begun to gather the supplies needed to start her refit. I have known for some time that epoxy would be used in every project, especially the decks. Over the last few months I have started to stock up on West Systems epoxy. This epoxy is used throughout the boat building and repair industry. It is so easy to use that even I have been able to figure it out. There are many other brands and I am sure they all work great but I have chosen West Systems because so many people consider it idiot proof and I can buy it at a pretty good discount. I think I have enough to get me started making a mess! 


I gathered up some core material as well. I recently bought six 2ft x 4ft sheets of end grain balsa core. This is what was used originally to core the later-model Alberg 30's decks. It is the same balsa wood material used to make model airplanes. While it seems flimsy in model airplanes, when cut perpendicular to the grain balsa wood is actually quite strong. I was surprised when I first learned this. I had considered some other waterproof types of core material but they were just too expensive. I believe if I am careful and take appropriate measures I can make the deck 100% waterproof.

While I am nervous about cutting open the decks of my Alberg 30, I am very anxious to get started on the next step of the rebuilding process. Looking at her deck and hull completely stripped down has me feeling a bit glum and worried about the scope of the work ahead.

Be sure to stay tuned.


Wednesday, August 19, 2015

Alberg 30 refit: Hull To Deck Joint Failure Photos

I finally got around to taking a further look at the hull-to-deck joint. I can't really tell why it failed but my best guess is the lack of sealant/joint compound. I don't see any evidence of it in the failed portion of the joint.
Here is where the joint looks normal. That sealant appears to be from the factory.

I took some of the repair sealant out and cleaned up what I could, I am hoping I can simply cinch back into place.  

A different angle and a better look at just how far it has separated.

Another angle looking down on the hull-to-deck joint. 

So as of right now the plan is to strip off all the old wooden toe rails, genoa tracks, and anything else that is attached to the toe rail. After that I will repair the lifted part and fiberglass the entire joint all the way around the boat. That is the plan for now.


Friday, August 14, 2015

Alberg 30 Refit: Hull to Deck Joint failure

This week has been very productive. This is because the outside temps have fallen into the mid 80's with little humidity, making for a very enjoyable evening and an easier work day. This has led to some boat work. With the bottom of her hull drying out I was able to begin removing items from Sal's top deck.

You can see all the stanchions and the bow pulpit removed.

In this photo you can see where the bow pulpit base plates were mounted. I am not 100% sure when the last time any of this stuff was rebedded (sealed) but I am finding wet core material in her decks. I'll explain the core in a minute.


Here is a picture of Sal's mast base. 

Here it is again with the base removed; looks nasty. All of her core is rotten. This is a common problem on Alberg 30s of this vintage. Unfortunately her decks are worse off than I previously thought.  

Here is a good photo of  how the deck is made and how it should look. In this photo you can seen the yellowish-brown balsa wood core. On either side of the core you can see the fiberglass which adheres to this core to make a nice sound rigid structure. When making a hole on the boat one should seal these areas of exposed core to prevent water intrusion. The problem is many manufacturers never took that extra step and over the years water made its way into the core. With no way out for the water, it just sits there and rots the wooden core.

Here is a close up of the holes that were used to pass cable that went up the mast. Years of water intrusion has turned this area into a "soft spot" and there is now compression on the mast post below. That black stuff is wet rotten core.

On to Bigger Issues:
Hull-to-Deck Joint Failure!!!

While researching my Alberg 30's history online I found some forum posts about Salacia (named Dances with Waves at the time) having hull-to-deck joint issues. In the post, her owner described it as "Oil Canning" on the port bow. Ever since we purchased her I could see the evidence of where the repair had been made. Today I got a really good look. I'm not happy about what I found, but...it can be fixed.

Photo of Alberg 30 hull-to-deck joint. This where the manufacture fastened the deck and hull together. These boats were made in two separate pieces and then jointed together. This joint is crucial to the overall structural integrity of the boat and, ultimately, to her seaworthiness.

Here is a photo I pulled from Alberg37.org (Alberg 30's big sister, the Alberg 37). It is an exact representation of how Sal's hull-to-deck was built. Both boats were manufactured by Whitby Boatworks in Canada so it is no surprise the joints were built the same.


Here is the failure area. You can see the deck is lifted from the hull. The owner at the time just filled the gap with some sort of sealant and kept on sailing....

Here is the hull-to-deck joint that looks normal, with no gap. I will clean these areas over the weekend and post better photos.

As I continue to dismantle Salacia I continue to find issues. I am not unhappy about these things, and I am actually glad they are coming to light so I can fix them properly and feel confident in her seaworthiness.


Saturday, August 8, 2015

Alberg 30 refit: Dimples on her bottom

It has been very hot and humid here lately; and so I have not had the drive to go outside after work to get anything done on Sal. Although last Sunday I did wash her down. Her once-white decks were a dark shade of blue from all the boat sanding. After that I scrubbed the bottom of the the boat with just plain water and a scrub brush. I did this to rinse the sanding dust and to get a good visual of what has to repaired now that the paint is gone.

With all of the paint removed from the bottom of the boat it is now time to begin preparations for the repair of the hull imperfections. I am not 100% convinced that what I originally thought were blisters are indeed actually blisters. The more I look at her bottom and the affected area it looks to me like all the little voids are just air pockets from poor lay-up of gelcoat. This was pointed out to me by a blog follower (thank you, Ariel CD36 ) . I believe he may be correct. Does this make it any better? Well...no not really. All these little holes have to be filled and sealed. Let the repair process begin!
Most of the small pin holes are in the dark shaded areas you see in the picture above.

Here is a close up of an affected area...all those tiny dark spots are pin-sized holes, though some are large enough to see fiberglass laminate in them.

My plan is to drill each one of those pin holes with a broad countersink bit. This picture shows the one I've been using. I will drill in about 1/8 of an inch to open up the pin hole enough to get any contaminates out and make it large enough to make a good fill area for the epoxy filler.  

Here is the same area after I hit each of those pin holes with the countersink bit creating an open dimple in the gelcoat. You can see it opens up the pin hole quite nicely and provides a  good large surface for the epoxy to adhere to. This is only one small area, maybe 4" x 4". I have been doing this to the bottom for a week now and only have a very small portion completed. It's going to take a while.

In the meantime I have started to turn some attention to the decks. I have to remove all the fittings, hatches, railings ......you name it, it has to come off to begin deck repairs.

First item off was the seahood above the sliding companionway hatch (you can see it in place in the deck picture above). This seahood hatch protects her cabin from sea spray and ultimately keeps water out of the boat. 

 Next on the chopping block are these lovely speakers some previous captain decided needed to go right here.
They cut 4-inch holes in the boat to install these.   ??...!!
I'll be kind and assume they just liked music more than they cared about the boat. Everyone has different preferences.

As the summer rolls along I am trying to finish some other side projects that are going to bring in some refit money. I wish I could spend more time on the boat but with the heat and humidity lately, progress will be slow for probably another month.