Showing posts with label A30. Show all posts

Sunday, March 27, 2016

Alberg 30 Refit: Mast Support Beam & An Unexpected Tent Shelter Repair

Happy Easter to all!
I've been delinquent in posting perhaps, but there has been plenty of work going on. The weather has been a factor lately too. February/March are typically the worst months for weather and that held true this year. Although it has been unusually warmer, the mild days have been sporadic and not really consistent enough to start any epoxy or fiberglass work.
We had a severe line of thunderstorms that came through toward the end of February and caused quite a bit of damage to my boat shelter. I feel fortunate that this is all that happened because no more than 30 miles to the west several people were killed by tornadoes from those same storms.

After assembling the tent I knew that it would have to be secured by straps or it would be blown away. I intentionally did not design it as a permanent structure so I could avoid problems with the city code inspector. For over a year and through several storms it has worked quite well...until recently. This failed strap is what I believe caused my tent damage. At its worst, the storm winds kicked up to near-hurricane speeds for for a brief 10-15 min window. It was during this period that the strap broke.

This picture was taken the next day, after I had already moved the tent off the house. During the storm, once the strap broke the tent became airborne...or at least tried to. In an effort to move to the next town over, the tent bent and twisted the front half of the structure supports and buttressed up against the side of the house. It caused some minor damage to my gutters which was not too big a deal. The damage was minimal and could be repaired.  I will note that even with the failed strap, our Sal was kept dry for the most part. It took me a few days to get the bent pieces replaced and I am happy to report the tent is back up and stronger than before.

The boat refit is coming along slowly. I have been gathering pieces and making a plan but execution of said plan has been a bit lacking. Work and side projects have been taking up a ton of time as I have been running the ferry both days of every weekend to generate money for more boat parts. A valid excuse when one is refitting a boat on a budget. As the weather warms up I will have both the funds and the time to pick up speed...at least that's the plan.
Lately I've been working on the deck beam and now have it ready to go back together.

Here is the deck beam on my "Liner" Alberg 30 all sanded and awaiting additional support. 

I will lay new layers of 1708 biaxial cloth in these low spots before bolting in beam reinforcement.

Looking to the port side of the beam; not as many low spots but still a few.

Here is the new plate that will be the back bone of the reinforcement and repair.

I am using this router table to help shape the piece of 3/8 G10 board.

A nice 1/4 rounded edge, this stuff works just like wood.

New piece clamped into place for a test fit.


After plate is mounted I will add a 3" wide beam aft of it. This beam will support the aft part of the mast step.

The beam will be made of 8 pieces of 1/8" thick G10 laminated together to form the new beam. That gap seen is caused by the deflection in the cabin top from original damage. I was advised to leave the deflection and just build the new support off of it. The gap will be filled with 406 thickened epoxy.

Same gap to port

Once all of it is epoxied in place I will make gussets from the face of the original beam to the new bottom of the laminated beam.

If you are unclear about the repair stay tuned, I hope to have it done in the next few weeks and I will post pics of process and product as it comes together. Once the repairs belowdecks are complete I will begin the topsides of the mast step. Once I get  the mast step back together I will pick up on deck re-coring. Much work to do but looking forward to it.

Thank you for following!

Friday, August 14, 2015

Alberg 30 Refit: Hull to Deck Joint failure

This week has been very productive. This is because the outside temps have fallen into the mid 80's with little humidity, making for a very enjoyable evening and an easier work day. This has led to some boat work. With the bottom of her hull drying out I was able to begin removing items from Sal's top deck.

You can see all the stanchions and the bow pulpit removed.

In this photo you can see where the bow pulpit base plates were mounted. I am not 100% sure when the last time any of this stuff was rebedded (sealed) but I am finding wet core material in her decks. I'll explain the core in a minute.


Here is a picture of Sal's mast base. 

Here it is again with the base removed; looks nasty. All of her core is rotten. This is a common problem on Alberg 30s of this vintage. Unfortunately her decks are worse off than I previously thought.  

Here is a good photo of  how the deck is made and how it should look. In this photo you can seen the yellowish-brown balsa wood core. On either side of the core you can see the fiberglass which adheres to this core to make a nice sound rigid structure. When making a hole on the boat one should seal these areas of exposed core to prevent water intrusion. The problem is many manufacturers never took that extra step and over the years water made its way into the core. With no way out for the water, it just sits there and rots the wooden core.

Here is a close up of the holes that were used to pass cable that went up the mast. Years of water intrusion has turned this area into a "soft spot" and there is now compression on the mast post below. That black stuff is wet rotten core.

On to Bigger Issues:
Hull-to-Deck Joint Failure!!!

While researching my Alberg 30's history online I found some forum posts about Salacia (named Dances with Waves at the time) having hull-to-deck joint issues. In the post, her owner described it as "Oil Canning" on the port bow. Ever since we purchased her I could see the evidence of where the repair had been made. Today I got a really good look. I'm not happy about what I found, but...it can be fixed.

Photo of Alberg 30 hull-to-deck joint. This where the manufacture fastened the deck and hull together. These boats were made in two separate pieces and then jointed together. This joint is crucial to the overall structural integrity of the boat and, ultimately, to her seaworthiness.

Here is a photo I pulled from Alberg37.org (Alberg 30's big sister, the Alberg 37). It is an exact representation of how Sal's hull-to-deck was built. Both boats were manufactured by Whitby Boatworks in Canada so it is no surprise the joints were built the same.


Here is the failure area. You can see the deck is lifted from the hull. The owner at the time just filled the gap with some sort of sealant and kept on sailing....

Here is the hull-to-deck joint that looks normal, with no gap. I will clean these areas over the weekend and post better photos.

As I continue to dismantle Salacia I continue to find issues. I am not unhappy about these things, and I am actually glad they are coming to light so I can fix them properly and feel confident in her seaworthiness.


Saturday, August 8, 2015

Alberg 30 refit: Dimples on her bottom

It has been very hot and humid here lately; and so I have not had the drive to go outside after work to get anything done on Sal. Although last Sunday I did wash her down. Her once-white decks were a dark shade of blue from all the boat sanding. After that I scrubbed the bottom of the the boat with just plain water and a scrub brush. I did this to rinse the sanding dust and to get a good visual of what has to repaired now that the paint is gone.

With all of the paint removed from the bottom of the boat it is now time to begin preparations for the repair of the hull imperfections. I am not 100% convinced that what I originally thought were blisters are indeed actually blisters. The more I look at her bottom and the affected area it looks to me like all the little voids are just air pockets from poor lay-up of gelcoat. This was pointed out to me by a blog follower (thank you, Ariel CD36 ) . I believe he may be correct. Does this make it any better? Well...no not really. All these little holes have to be filled and sealed. Let the repair process begin!
Most of the small pin holes are in the dark shaded areas you see in the picture above.

Here is a close up of an affected area...all those tiny dark spots are pin-sized holes, though some are large enough to see fiberglass laminate in them.

My plan is to drill each one of those pin holes with a broad countersink bit. This picture shows the one I've been using. I will drill in about 1/8 of an inch to open up the pin hole enough to get any contaminates out and make it large enough to make a good fill area for the epoxy filler.  

Here is the same area after I hit each of those pin holes with the countersink bit creating an open dimple in the gelcoat. You can see it opens up the pin hole quite nicely and provides a  good large surface for the epoxy to adhere to. This is only one small area, maybe 4" x 4". I have been doing this to the bottom for a week now and only have a very small portion completed. It's going to take a while.

In the meantime I have started to turn some attention to the decks. I have to remove all the fittings, hatches, railings ......you name it, it has to come off to begin deck repairs.

First item off was the seahood above the sliding companionway hatch (you can see it in place in the deck picture above). This seahood hatch protects her cabin from sea spray and ultimately keeps water out of the boat. 

 Next on the chopping block are these lovely speakers some previous captain decided needed to go right here.
They cut 4-inch holes in the boat to install these.   ??...!!
I'll be kind and assume they just liked music more than they cared about the boat. Everyone has different preferences.

As the summer rolls along I am trying to finish some other side projects that are going to bring in some refit money. I wish I could spend more time on the boat but with the heat and humidity lately, progress will be slow for probably another month.


Saturday, July 4, 2015

Alberg 30 Refit: Happy 4th of July 2015

Happy 4th of July!
Happy Independence Day, America!

This picture was taken May 22nd while on the ferry. I have actually seen a few fireworks shows this year while running the ball park ferry. I hope everyone has a safe a fun 4th. I wish we could be with friends and family but I have been called in to run an extra ferry to handle tonight's fireworks show in Norfolk.
On to boat work update:
This what I started with yesterday, a scraped starboard side


 And this is how the boat looked after about 4 hrs of sanding! 

I have question all you Good Old Boat guys, there appears to be a red gelcoat  stripe all the way around the boat at the original waterline? The boot stripe on the boat appears to be 3-4 inches higher than the original waterline. I heard that some Alberg 30 sterns appeared to sit low in the water. Our Sal did not. She sat quite nicely; I wonder if this is because someone altered the waterline. 

Because I did not want to get too dirty working on the bottom I decided to take more stuff off the boat in preparation for work inside. Salacia has a small volume interior compared to some 30ft boats and I am still amazed at how much stuff can be stored! I feel like we've already offloaded so much and there's still more to be done, 
Work continues, and I am hoping that the nastiest part of the job is just about over, as I finish up the bottom paint removal process. I will then begin repairs on the bottom in preparation for her barrier coat.

Have a safe and relaxing holiday weekend!

Thursday, June 11, 2015

Alberg 30 Refit: Bottom paint removal continued and hull blisters

This evening I finished up the nasty dirty paint removal task on the port side of the hull. During the last few months I have been pretty busy with work, family and other projects and I was becoming frustrated and worried that the refit would never progress. I had piddled around here and there but no major tasks were getting done. Fortunately, this has changed. I made it a priority to get this refit rolling.

I had been using a 6" sander to remove the paint. That thing made all kinds of dust. It removed the paint but was a bear to use. I decided to try scraping a majority of the paint. This turned out to be a great decision. In about 4 hours time I had scraped almost the entire side. 

After scraping a majority of the paint, sanding with a 5" Bosch orbital sander made getting to the gelcoat quite easy. Another 4 hours and I had 2/3 of the port side hull down to the gelcoat.

Working away at little bit at a time, I put in 2 hours last night.

Using the trailer as a bench and stool has come in quite handy.

Another angle of the sanded hull

Here's where the bad news starts. My Alberg is full of blisters (water intrusion), This is a good example of one. From what I can tell this is not a new problem and one that someone tried to repair long ago...about 6 layers of bottom paint ago to be exact, so maybe 20 years ago....who knows???

You can see the hull issues better in this photo. That discolored area which extends all the way to the stern seemed to be some severe crazing, and is full of blisters

The red dots appear to be old blisters that were filled and the other dots are new blisters. 

As you can see from the pictures I am making progress. I seemed to have opened a can of worms here on the hull. I surely want to fix the issues as best I can, but I also want to be sensible about the repair. I am devising a plan now to use West System epoxy for the repairs, and until then I'll be sanding the starboard side. More to follow!

Thursday, May 21, 2015

Alberg 30 Refit: Bottom paint removal

And I've already run into an issue. I started working on the bottom, beginning with the nasty job of removing bottom paint. When I got Sal out of the water I realized she has between 5-6 layers of paint. This being the dirtiest job, I decided to tackle it first. Upon inspection of the hull I noticed some weird coloring where the paint had chipped or cracked away. I decided to start where I noticed this weird coloring.

That small white area is where I started. Small pin holes and the funny looking pattern immediately had me concerned.


Sanded a small area, the odd pattern and pin holes seemed to be wide spread. Can of worms opened! 


As I began to remove the paint I quickly realized that this was going to be way more nasty than I ever imagined. Blue dust was everywhere. I did have a respirator but that was not nearly enough. A few days later with a the proper PPE I decided to investigate that area more. I began sanding with a 6 inch disc sander. Very good tool for the job. Within an hour I had removed about a 4' x 3' area and the odd pattern just kept going. I was looking for the original gelcoat and it was nowhere to found. The gelcoat is the outer protective layer of fiberglass boats, that seals and protects the fiberglass. My immediate thought was that the boat had suffered some damage in the area. I was starting to get worried.

This is the area I sanded. Almost 2 hours of nasty work. 

This is a close-up of what I found

I decided to stop because I was getting pretty discouraged with how widespread the affected area was. I sent a few pictures of it to people I consider "Plastic Classic" (old fiberglass boat) gurus. After a few days of emails and a few calls the general consensus was that the boat was not damaged and I was just seeing crazed/cracked, thinned gelcoat. These pin holes were voids in the layup between the gelcoat and the fiberglass. It seems as though somewhere in Sal's past someone sanded way into the gelcoat. At this point I am still weighing options about how to address the issues I found, but in the meantime I have to finish sanding the hull. I hope to have it completed soon. I believe I can do it in a week if I just buckle down.
Stepped back a bit to get a better view, have a lot of work ahead of me!

I have been pretty busy away from the boat with everyday life. I picked up quite a few extra hours captaining the ferry to get some money into the refit fund. I also had a milestone birthday (40!) and we had some special family members come for visits. I will blog about that in coming days.

Take care~


Thursday, February 26, 2015

Repowering our Old Alberg 30?


During our refit I have given some thought to perhaps repowering our Alberg 30 with a new propulsion system. It's not that the one we have is not adequate, it is just old. Why not replace Sal's Atomic 4 while she's here at the house?


Here is a picture of the Atomic 4 that we have now. She is still a very good engine, but it's old technology and uses quite a bit of fuel, not a good option for cruising beyond America. She was rebuilt back in 2008 by A4 gurus at Moyer Marine, and hasn't really been any trouble for us. 

(picture from Betamarine.com)
Here is what I would like to put into our Alberg 30, a Beta 14 Diesel. This engine uses probably 1/3 the fuel of the Atomic 4, and diesel on a sailboat is safer than gasoline. So why not? Well, the $8,000 price tag. That's about 5000 extra reasons why this will not be at the top of the list.


(picture from starmarineinc.com)
Next consideration is the outboard. While not exactly designed to push a boat of Sal's size, in calm water it does just fine. I have seen several cost-conscious cruisers with boats similar to ours using this option. It frees up space on the inside of the boat and uses about 2/3 the fuel of our current system.
(picture from Thunderstruck.com)
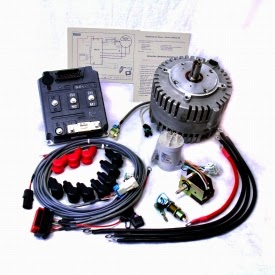
Next there is electric power. I really like this option for some reason. No more fuel costs other than batteries (every 5-6 yrs). This system's only draw back is range. The large battery bank needed to supply a decent range is just not practical on a boat of our size. But let's face it, our Alberg is a sailboat...how much should we be motoring anyway?

These are our choices and I am still doing the research on each. Each option has its pros and cons and I will be weighing them out here on the blog during the coming months.
What are your thoughts on powering a sailboat?