Sunday, November 29, 2015

Alberg 30 Refit: Lazarette Nearing Completion, and More Rotten Core

I hope all our family, friends and followers has a peaceful and relaxing Thanksgiving weekend. We had a wonderful holiday. It was restful and happily spent with friends who have become like family to us.
 As usual, they cooked up a feast, and this year I was the honorary turkey chef. We deep fried the turkey and it was absolutely delish! Of course we also had the traditional Thanksgiving staples like baked ham, mashed potatoes, stuffing, green beans, corn, cranberry sauce and gravy.

Enjoying a turkey leg, a cold beer and some football!
After dinner we indulged in some great homemade apple crisp and ice cream. Then everyone in the house took a well-deserved nap, crashing out on the couches and floor in the family room. 

Prior to heading over to our Thanksgiving dinner I managed to get a bit of boat work done. The weather was great, 70 degrees and sunny, couldn't ask for a nicer day.

I began sanding down the fairing epoxy (pinkish area). The fairing epoxy helps fill in the low spots, making a nice smooth surface.

This is looking at the starboard side after initial layer of fairing epoxy was sanded. You can see the varying shades and colors, which is the different layers of fiberglass and fairing expoy making a  smooth surface.

 Starboard side

Port side of lazarette is looking more level and fair (flat surface). From here on out the sanding on the lazarette will be completed by hand with a long board...not looking forward to that one bit. They call it torture boarding! On the next warm day I will add more 407 West Systems fairing epoxy to the deck and begin the torture boarding!

Yesterday I captained a short family-friendly "Santa" cruise on the whale-watching tour boat that I've been driving for occasionally. Afterwards, with yet more beautiful weather on tap, I decided to explore additional areas of Sal for rotten core. I knew there would be more to find, especially on the side decks. This was because they would always creak a bit when walked upon, and while sailing I would see some of the deck flexing when stanchions were bumped...a good indication the core was rotten in those areas.

First place I decided to cut was the jib track area on the port side deck. I knew if anywhere was going be wet and rotten it would be here. When removing the fasteners that had secured them to the deck in preparation for refit, I found that they were all hand-tightened and had almost no sealant on them. I have a strong suspicion these bolts had never been tightened or resealed throughout Sals 44 years of existence. Honestly, I'm just as guilty as everyone else who owned Sal; I never checked them. 

Here is a rotten area also on the port side deck. This is where a stanchion was and you can kind of see the outline of a stanchion base. Obviously our Alberg has had rotten decks for some time. Looks like someone long ago tried to repair the area by pouring some resin filler and sanding it smooth. 
This is not really a big thing as I will eventually replace it all and make it better than new.


As I was cleaning out the area and seeing how wet the core was, I noticed the core didn't look quite right. Yes it was wet, soft and rotten, but something else also seemed off. As I looked closer I began to realize the that core was thinner than the lazarette area. I grabbed a square of the new 3/8 core and laid it in the cut-out area. Sure enough, the old balsa is thinner than the 3/8, and my side decks are apparently different than every other Alberg 30 I have ever read about.

After some measuring I determined that Whitby built my Alberg 30's side decks with 1/4 inch balsa and not the 3/8 inch I have read about on other Albergs. The top skin also appears to be thinner as well, only about .130 (thousandths of an inch) or about 1/8 inch thick. The lazarette area used 3/8 core and top skin was about .180 or 3/16 of an inch. Another difference is the bottom deck skin: It was a lot thicker, almost .200 where the lazarette was maybe .060 or so. I guess Whitby had some 1/4 balsa core they needed to get rid of... who knows!?

This photo shows how much thicker the new core is than the old stuff I took out.

So maybe I have an odd side deck, nothing too major. I believe I can exchange out the new 3/8 balsa core for 1/4, thankfully I bought it locally. I don't believe my decks are any weaker or stronger than any other Alberg 30. I think Whitby made up for the lack of core thickness with lower deck skin. This week I will work on obtaining some 1/4 balsa core and begin the side decks.

Boat Repair: It's always something!
Stay tuned


Tuesday, November 24, 2015

Alberg 30 refit: Lazarette recoring cont.

The re-coring of the lazarette continues.It has been a lot of work but also a great learning experience. It takes great deal of courage to make that first cut into a fiberglass deck. I was very green at the start and I still have a lot to learn, but now I am starting to see it all come back together. Knowing what to expect will help the rest of the deck re-coring move along a bit more quickly. As of today I have the third and final layer of 1708 biaxial cloth laid. The deck can now bear weight. Below are photos of various building stages of the lazarette deck. 

After I had installed the new balsa core I still had some sanding to do to get the edges of the balsa level with the edges of the old deck. You can see in the above photo there are lighter areas along the wood, This is where it is sanded to make everything flush.

After the sanding of the balsa core I began cutting the new 1708 biaxial fiberglass. I used the balsa paper templates and laid them out over the fiberglass. I cut the fiberglass 2 inches wider than the template to overlap the beveled edges of the old deck. This 2 inches provides the bond between the old and new deck surfaces

After laying on the the 1708 fiberglass, I used a special roller to get the air bubbles out. This was very time consuming. I rolled each piece out for about 10-15 min. Once that was complete, I cut the second layer of fiberglass. I wanted to get 2 layers on.

Here you can see the second layer in place. I made this piece out of one single swath of fabric. I did this because the first layer was made from 3 separate pieces, so having one contiguous second layer will add to the overall strength of deck. 
You can see the fiberglass cloth is still white in this photo, before it has been saturated with epoxy resin.

This is the result of one afternoon of glass work. You can see the fiberglass had become translucent from being saturated with resin and all air pockets are removed.

A few days later I broke out the trusty Bosch orbital sander and armed it with 36 grit disc. I began fairing in the edges of the old deck with the newly laid fiberglass. After I had all the edges sanded I moved to the second layer of glass, knocking down any extreme high spots and giving it an all-over good sanding in preparation for the third and final layer of 1708 cloth.

On this day the overnight temps had gotten down into the 40s. I needed to wait until temperatures came up to at least 55 degrees before I began laying any epoxy. In the meantime to help the epoxy along, I brought out an electric skillet. I set it to about 200 degrees, and after about 30 mins and some gentle shaking the epoxy was warmed up and ready.

Before starting I tagged the second layer

The 3rd and final layer of 1708 biaxial cloth. After I finished laying in the last of it, I let the area set up while I went and ate a good lunch the first mate had cooked up. During that time the epoxy became tacky. This was the perfect time to add first layer fairing, so it would bond with the tacky epoxy already on deck and fill in the weave of the fiberglass cloth. Sorry I don't have any pictures of the area before adding the West Systems 407 fairing; my hands were quite sticky.

Just a skim coat of the fairing epoxy on most of the deck area. I also made sure to keep marking the spot for the chainplate as I did each layer.

Another angle of the port side lazarette. I am really happy how the last and final layer finished up. I still have lots of fairing and finishing work to make it look all pretty and smart but I'm quite proud of how it has turned out so far.

I want to thank James Baldwin of Atomvoyages.com, Matt B. of Alberg35.com and Neil R. of berhia.wordpress.com. You guys talked me through this process and helped tremendously. I learned a lot on this small area of the boat and feel confident I can tackle the rest of the decks.

Happy Thanksgiving!!

Friday, November 13, 2015

Alberg 30: Meeting the Captain of Jean-du-Sud

Every week while running a ferry at mile marker 0 on the Intracoastal waterway, I see hundreds of cruisers tie up at the free docks in Portsmouth, VA. There are boats of all sorts; power boats, sailboats, 100-300ft mega yachts...you name it, and chances are I've crossed wakes with it on the river. The boats I like most are the plastic classic cruisers, the 25-35 ft sailboats from 1960-1985. Those are the people I can relate to. I love walking the docks when I spot one, and chatting with the people who own these boats. 
The sailboat community as a whole is rather small and has a few celebrities, if you will. A few names, whether of the sailor, the boat, or both, are quickly recognized within the community.My own celebrities are the well-known seafarers of the small plastic classics that I admire. If you own an Alberg 30 or a Capehorn windvane then you probably know the names Jean-du-Sud and Yves Gelinas. Yves designed the Capehorn windvane for his circumnavigation of the globe on his Alberg 30 Jean-du-Sud. Yves documented the voyage, and produced an award winning movie from the footage. Below is the trailer from YouTube:

 
Last Sunday on my way to run the ferry I saw a shorter mast than all the others at the High Street free dock. I decided to swing by the dock before heading to the ferry. As I drove closer I could not believe what I was seeing: another Alberg 30...and not just any Alberg 30. It was Jean-du Sud. I quickly parked and went to the see if Yves was onboard. Unfortunately, he was not. However I did meet another couple cruising a beautifully restored Tartan 34 docked nearby. They told me Yves was out but would be back. Before leaving I snapped a few pictures of Jean-du-Sud, and then headed to work. People come and go so often at these free docks I wasn't sure if I would actually get to meet Yves Gelinas.

Jean-du-Sud with side mount outboard

Taken from wheelhouse of ferry

Famously one of the best windvanes, the CapeHorn.
www.capehorn.com

After completing my day on the ferry I returned to the dock and found Yves onboard. He was very welcoming, especially after I told him I was a fellow Alberg 30 owner. I enjoyed a lengthy discussion about his Alberg. He invited me down below and showed me all the modifications he had made for the "roaring forties" as he called it (referring to latitudes in the southern hemisphere known for their boisterous conditions, for our non-seafaring followers).

Yves onboard his Alberg 30

There I am with Yves onboard Jean-du-Sud.

Jean-du-Sud is without a doubt the most famous of all Alberg 30's, and Yves is one heck of a sailor, filmmaker and inventor. He and Jean-du-Sud have sailed 40,000 miles together to prove it. It was an honor for me to tour Jean-du-Sud and even more of an honor to meet Yves Gelinas.

Wednesday, November 4, 2015

Alberg 30 refit: A Small Bit of Deck Progress and a Whole Lot of Nova Scotian Maritime Adventure

Hello everyone sorry for the delay in posts. October was a crazy but wonderful month. We didn't get much done on Sal at all. However, we did take a wonderful and relaxing vacation to Nova Scotia, Canada. More about that later down the page. 
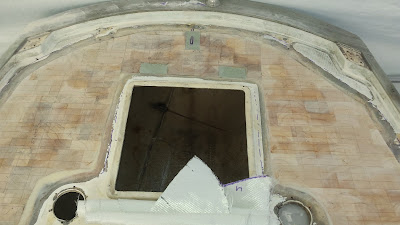
On Halloween our schedules finally allowed for some boat work. We installed the new core into the lazarette area. Not much to see except some balsa core and thickened epoxy. 

The lazarette completely cored, there is still much work to do before new skin goes on.

The whitish stuff that outlines the balsa core is thickened epoxy. The reason for the large gaps is because in this area the lower skin transitions up. I should have cut the top layer out farther away from the deck's edge. 

More of the same on the port side

G10 place where chainplate and hinge fasteners will pass thru the deck....no more water leaking into the core.

I learned a lot during this process. First mate and I work together like a well-oiled machine. She mixed the epoxy and thickened it (just like mixing up a batter in the kitchen, according to her), while I spread it and filled the gaps. Together this little area took us about 2.5 hours.
There is still lots of work ahead but it feels nice to make some progress.

Now for the exciting stuff: a trip to Nova Scotia! We decided to take a break from our normal vacations to family this year and go somewhere different. Somewhere we could relax, enjoy the outdoors in a cool climate, and most importantly: somewhere with a strong maritime heritage! 

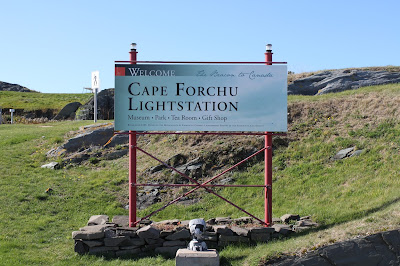
We started out in rural western Nova Scotia, exploring the area around Yarmouth.


 Waves crashing on the rocks at Cape Forchu

 Bates Motel (actually The Lakelawn Motel & B&B in Yarmouth, NS; we loved it!)

 Town of Lunenburg's Waterfront. 
The entire town is designated a UNESCO World Heritage site.

 Crew of Picton Castle getting her ready for a voyage

This boat and name looked familiar to me but while looking at it I couldn't figure out why. A few days after returning I was paging through one of my sailing magazines and there she was. The Picton Castle is advertising their search for crew members for a major worldwide voyage.
 

Beautiful coastline along the northern shore of the peninsula, along the Bay of Fundy.
Monster 12-16 ft tides here in Digby, Nova Scotia.

 Eventually we made our way to Halifax where we spent several days. This photo is at the Halifax Public Gardens. 

Halifax Waterfront from from across the harbor in Dartmouth. 

First mate posing for a picture with town of Lunenburg in the background

Bluenose II in her home berth at the Fisheries Museum of the Atlantic. This is a replica of the famous lightning fast schooner Bluenose. Unfortunately she was already closed up for the season when we were there.

October was a great month. First mate and I took an amazing journey to Nova Scotia to celebrate our 12th anniversary. It was a trip that I will not soon forget. Only a small amount of boat work got done, but that's okay because small progress is better than no progress.