Friday, November 13, 2015

Alberg 30: Meeting the Captain of Jean-du-Sud

Every week while running a ferry at mile marker 0 on the Intracoastal waterway, I see hundreds of cruisers tie up at the free docks in Portsmouth, VA. There are boats of all sorts; power boats, sailboats, 100-300ft mega yachts...you name it, and chances are I've crossed wakes with it on the river. The boats I like most are the plastic classic cruisers, the 25-35 ft sailboats from 1960-1985. Those are the people I can relate to. I love walking the docks when I spot one, and chatting with the people who own these boats. 
The sailboat community as a whole is rather small and has a few celebrities, if you will. A few names, whether of the sailor, the boat, or both, are quickly recognized within the community.My own celebrities are the well-known seafarers of the small plastic classics that I admire. If you own an Alberg 30 or a Capehorn windvane then you probably know the names Jean-du-Sud and Yves Gelinas. Yves designed the Capehorn windvane for his circumnavigation of the globe on his Alberg 30 Jean-du-Sud. Yves documented the voyage, and produced an award winning movie from the footage. Below is the trailer from YouTube:

 
Last Sunday on my way to run the ferry I saw a shorter mast than all the others at the High Street free dock. I decided to swing by the dock before heading to the ferry. As I drove closer I could not believe what I was seeing: another Alberg 30...and not just any Alberg 30. It was Jean-du Sud. I quickly parked and went to the see if Yves was onboard. Unfortunately, he was not. However I did meet another couple cruising a beautifully restored Tartan 34 docked nearby. They told me Yves was out but would be back. Before leaving I snapped a few pictures of Jean-du-Sud, and then headed to work. People come and go so often at these free docks I wasn't sure if I would actually get to meet Yves Gelinas.

Jean-du-Sud with side mount outboard

Taken from wheelhouse of ferry
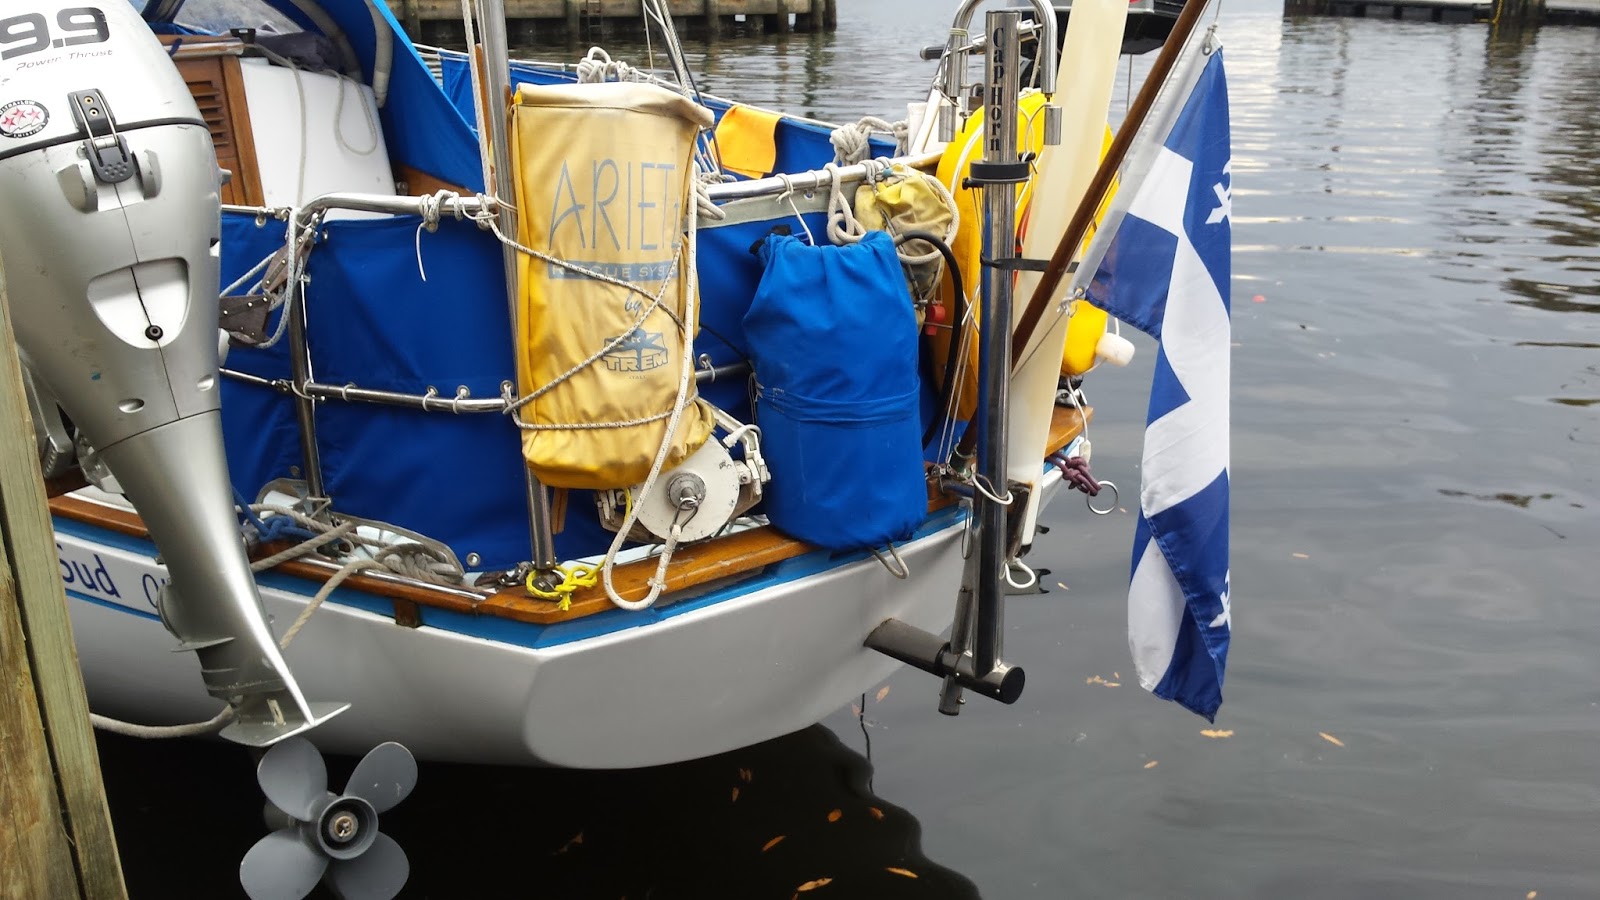
Famously one of the best windvanes, the CapeHorn.
www.capehorn.com

After completing my day on the ferry I returned to the dock and found Yves onboard. He was very welcoming, especially after I told him I was a fellow Alberg 30 owner. I enjoyed a lengthy discussion about his Alberg. He invited me down below and showed me all the modifications he had made for the "roaring forties" as he called it (referring to latitudes in the southern hemisphere known for their boisterous conditions, for our non-seafaring followers).

Yves onboard his Alberg 30

There I am with Yves onboard Jean-du-Sud.

Jean-du-Sud is without a doubt the most famous of all Alberg 30's, and Yves is one heck of a sailor, filmmaker and inventor. He and Jean-du-Sud have sailed 40,000 miles together to prove it. It was an honor for me to tour Jean-du-Sud and even more of an honor to meet Yves Gelinas.

Wednesday, November 4, 2015

Alberg 30 refit: A Small Bit of Deck Progress and a Whole Lot of Nova Scotian Maritime Adventure

Hello everyone sorry for the delay in posts. October was a crazy but wonderful month. We didn't get much done on Sal at all. However, we did take a wonderful and relaxing vacation to Nova Scotia, Canada. More about that later down the page. 
On Halloween our schedules finally allowed for some boat work. We installed the new core into the lazarette area. Not much to see except some balsa core and thickened epoxy. 

The lazarette completely cored, there is still much work to do before new skin goes on.

The whitish stuff that outlines the balsa core is thickened epoxy. The reason for the large gaps is because in this area the lower skin transitions up. I should have cut the top layer out farther away from the deck's edge. 

More of the same on the port side

G10 place where chainplate and hinge fasteners will pass thru the deck....no more water leaking into the core.

I learned a lot during this process. First mate and I work together like a well-oiled machine. She mixed the epoxy and thickened it (just like mixing up a batter in the kitchen, according to her), while I spread it and filled the gaps. Together this little area took us about 2.5 hours.
There is still lots of work ahead but it feels nice to make some progress.

Now for the exciting stuff: a trip to Nova Scotia! We decided to take a break from our normal vacations to family this year and go somewhere different. Somewhere we could relax, enjoy the outdoors in a cool climate, and most importantly: somewhere with a strong maritime heritage! 

We started out in rural western Nova Scotia, exploring the area around Yarmouth.


 Waves crashing on the rocks at Cape Forchu

 Bates Motel (actually The Lakelawn Motel & B&B in Yarmouth, NS; we loved it!)

 Town of Lunenburg's Waterfront. 
The entire town is designated a UNESCO World Heritage site.

 Crew of Picton Castle getting her ready for a voyage

This boat and name looked familiar to me but while looking at it I couldn't figure out why. A few days after returning I was paging through one of my sailing magazines and there she was. The Picton Castle is advertising their search for crew members for a major worldwide voyage.
 

Beautiful coastline along the northern shore of the peninsula, along the Bay of Fundy.
Monster 12-16 ft tides here in Digby, Nova Scotia.

 Eventually we made our way to Halifax where we spent several days. This photo is at the Halifax Public Gardens. 

Halifax Waterfront from from across the harbor in Dartmouth. 

First mate posing for a picture with town of Lunenburg in the background

Bluenose II in her home berth at the Fisheries Museum of the Atlantic. This is a replica of the famous lightning fast schooner Bluenose. Unfortunately she was already closed up for the season when we were there.

October was a great month. First mate and I took an amazing journey to Nova Scotia to celebrate our 12th anniversary. It was a trip that I will not soon forget. Only a small amount of boat work got done, but that's okay because small progress is better than no progress. 

Friday, October 9, 2015

Alberg 30 Refit: Alberg 30 deck recoring in progress, plus major tidal flooding!

It has been a month since my last post and honestly almost as long since I made any real progress. A 40 hour work week coupled with a few side projects to earn some refit cash and before I knew it a month had passed. Some good news is that the weather has cooled down and humidity has moved out for the most part. However, I cannot be totally blamed for the lack of progress: As many of you know we were hit with a blast of rain and wind from a couple of major storms.The inclement weather lasted for nearly a week, and finally cleared out of here just a few days ago. 
Today I was able to get most of the lazarette balsa core cut and into place for a test fit. 

About 3 weeks ago I was able to get all the old, wet rotten core removed.

Once all the old core was removed I beveled the edges of the decks to prepare them for the new layers of fiberglass that will be added after new core is laid down.

I was able to score some additional G10 3/8 fiberglass board at a very reasonable cost. This board is the same thickness as the new balsa core. It will be used wherever the deck is penetrated by a bolt hole or chainplate slot to keep water from getting to the new balsa core.

In this picture you can see where I cut a piece of the G10 board to surround the chainplate hole in the lazarette.


After I cleaned the area I started making templates so I could accurately cut the new balsa core pieces. I used heavy rosin paper to make the template.

I have all the new core for the lazarette in place. You'll notice at the top I cut the core around the G10 fiberglass board. I still have to cut a few more pieces of G10 for hatch hinge bolts but for the most part I am about ready to start epoxying in the new balsa.

Lazarette nearly ready to have a new core glued in.

It has been a bit slow going, and while I get frustrated with the lack of progress I am happy that it is starting to come together. Once the lazarette area is finished I will continue around the entire deck as needed.

Now to the major flooding!
We dodged a pretty serious storm last week. Hurricane Joaquin was forecasted to head right for us. Luckily the weather peeps were wrong again and the storm moved out to sea. However, the Hampton Roads area was pounded with several days of gale force winds and heavy rain. This caused some fairly major surge and tidal flooding.
This is what my ferry passengers had to deal with at Waterside in Norfolk. The pier and boardwalk were eventually under about 2.5 ft of water at high tide. This photo was taken 3 hours before high tide.


The heavy wind and surf tore up Virginia Beach's oceanfront. The beach suffered some major erosion and to top it off, a navigational channel marker washed up onto the beach, This Green #5 buoy was 100-150 ft from the normal waterline, a good indication of how bad the flooding and surge were during the height of the storm.


In Portsmouth, VA the water was coming over the sea wall and onto the promenade. 

Here is the first mate chilling at Rudy Inlet. We took a walk along the beach the day after the storm. Winds and surf had subsided some but not completely as you can see.

Stay tuned for more Alberg 30 refit work!


Monday, September 7, 2015

Alberg 30 refit: Lots of Holes & Rotten Balsa Core

Saturdays have been designated as "boat work day" by the first mate. She stays quite busy but has decided that on Saturday afternoons we will work on our Sal together.

Here she is poking out of the lazarette. Yoga training comes in quite handy on a sailboat- she fit in there quite nicely and helped get the fittings stripped off the decks.

Not too happy to have a photo taken :)

All the fittings and hardware have been removed from the lazarette area. This is the very aft area of the sailboat and looks very barren without anything attached. Its quite an accomplishment getting all hardware removed. There are no less than 84 holes through the deck in this small area.....84! Unfortunately all these holes through the deck led to water leaking into the core of the deck.

Here are the cheesy backing plates that secured all the rear hardware...most of them were so rotted and brittle they could be broken by hand...Just sad.


And this is what rotted core looks like. All that back mush is rotted balsa core.

I cut a very small area just to get started. Boy did I open a can of worms....this Alberg 30 is gonna be getting a new core...pretty much everywhere.

Closer look at the rot.

I cut a little further back....no surprise there.

This is a look at the underside of the top skin of the deck. What is surprising is how much of a fight it was to get off. While all the the core is wet, some of it is not quite rotten. 

A wider view of the work area

Still cutting and chasing wet core.


Even though this core is rotten, the deck will not just lift off after being cut...it's really hanging tough. It's going to be hard work removing all the bad material.

As the fiberglass top skin is being pried off it is cracking and separating...I am no fiberglass expert but this deck seems as though it was starved for resin...meaning not enough resin was used when the deck was originally constructed. I am not sure though; perhaps this is normal? If you are reading this and have some experience please feel free to leave a comment below.


All of the core on the port (left) side of the lazarette is saturated as well but the deck is very much still adhered. Prying the top layer has proven quite difficult so far.
I am not at all happy with how wet the decks are but as with everything else, I am not surprised. This area of the deck has always flexed quite a bit when I walked on it. I started back here because the area is small and seems to be in the worst shape. 

Stay tuned

Saturday, August 29, 2015

Alberg 30 refit: Formulating a plan and gathering supplies

Summer is winding down, I am finishing up a few side projects and soon the very serious refit work will begin. This week I began to formulate a plan of attack for Salacia's topsides. I spoke with a few people throughout the week for some guidance on how and where to begin (thank you James, Neil , Matt and John). I always like to get different perspectives on how to approach things...especially things I am not 100% familiar with (e.g. fiberglass boat deck repair.) 
After speaking with these guys, I have come up with a plan. 
I will first attack the re-coring of our Alberg 30's deck. This will be a very time-consuming job. I will add many improvements to the coring so hopefully this will be a once-in-my-lifetime job. I will add some structural support at the mast base throughout the deck, especially where the deck will see heavy forces applied to it.  
I am hoping to get started on it in the coming weeks.

I have to keep looking at the great pictures of our time sailing Sal to remind me why I am doing this!

Approximately two years ago her decks looked 1000% better than they do today.

This was taken this afternoon. We now have about 90% of her decks stripped of fitting, nuts and bolts. By next week we should be at 99.9% 

Removed the inner jib tracks, and I was amazed at just how easily these came off. I figured they'd put up more of a fight, but I'm thankful they didn't. They were so easily removed that I can now see how water had penetrated the bolts and holes in the deck to saturate her deck core. 
I am sure this is the first time these tracks have been removed in all of Sal's 44 years.


The gathering of supplies:
I have begun to gather the supplies needed to start her refit. I have known for some time that epoxy would be used in every project, especially the decks. Over the last few months I have started to stock up on West Systems epoxy. This epoxy is used throughout the boat building and repair industry. It is so easy to use that even I have been able to figure it out. There are many other brands and I am sure they all work great but I have chosen West Systems because so many people consider it idiot proof and I can buy it at a pretty good discount. I think I have enough to get me started making a mess! 


I gathered up some core material as well. I recently bought six 2ft x 4ft sheets of end grain balsa core. This is what was used originally to core the later-model Alberg 30's decks. It is the same balsa wood material used to make model airplanes. While it seems flimsy in model airplanes, when cut perpendicular to the grain balsa wood is actually quite strong. I was surprised when I first learned this. I had considered some other waterproof types of core material but they were just too expensive. I believe if I am careful and take appropriate measures I can make the deck 100% waterproof.

While I am nervous about cutting open the decks of my Alberg 30, I am very anxious to get started on the next step of the rebuilding process. Looking at her deck and hull completely stripped down has me feeling a bit glum and worried about the scope of the work ahead.

Be sure to stay tuned.