Wednesday, January 27, 2016

Alberg 30 Refit: Digging into the Mast Support Beam

Over the last few days I've been digging into the mast beam, carefully. I have not been too happy with what I have been uncovering. I am going at this slowly because I just don't know what is under the liner, and I don't want to cause any further damage by being careless. 
Below are photos of what I have found so far. 

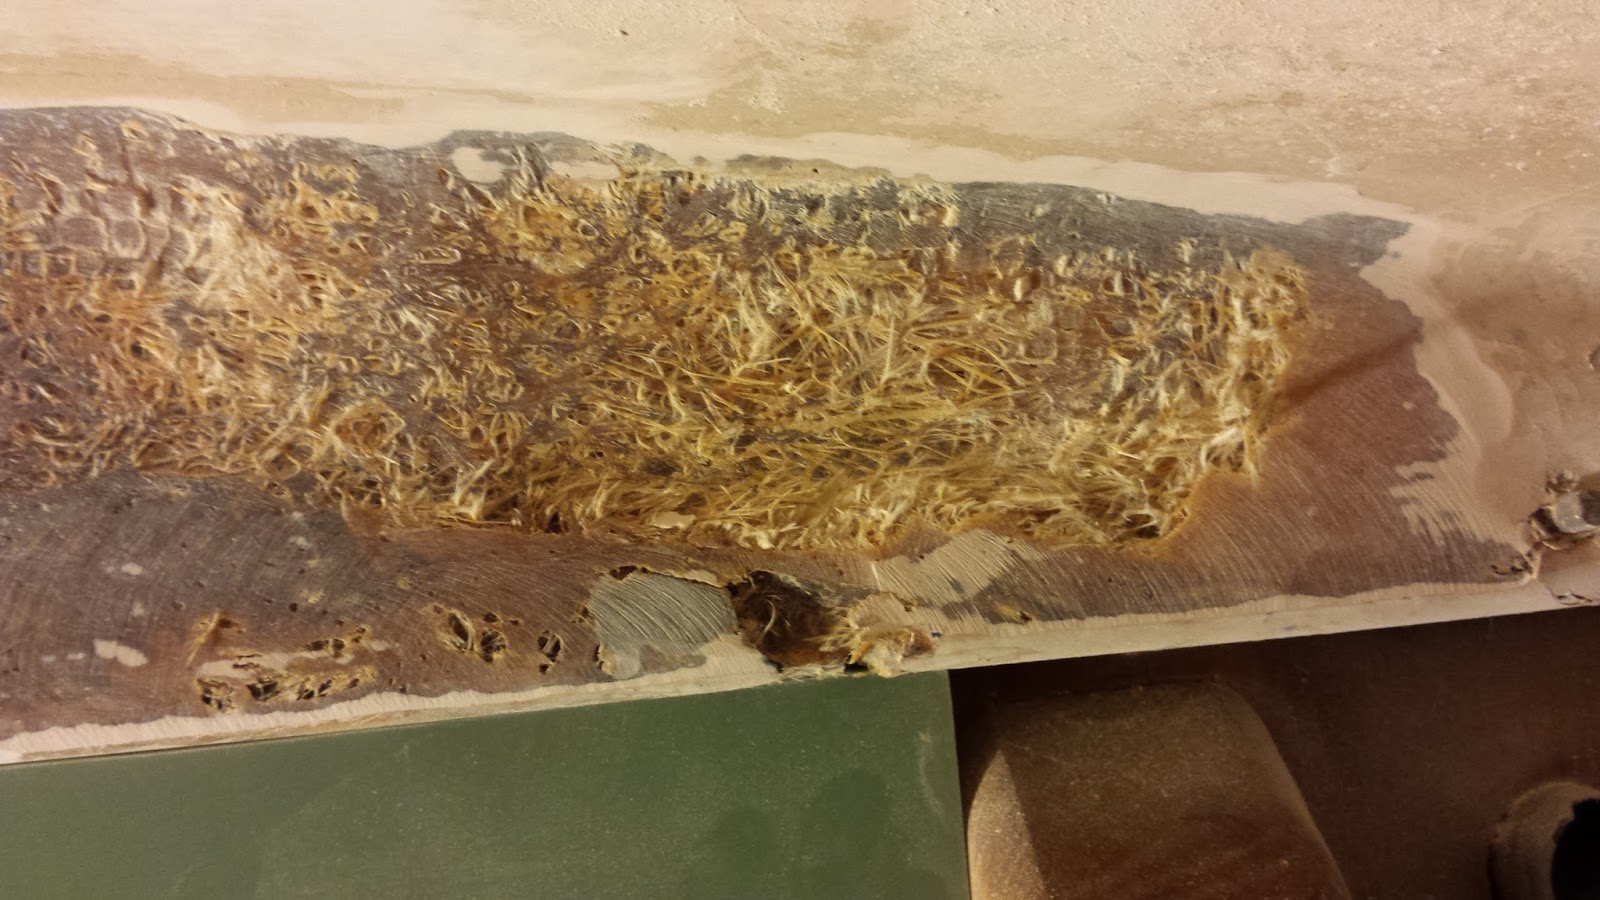
I used a large flat blade screwdriver and began digging into the loose layup. I was able to dig all of the loose area out in just a few minutes....it's no wonder the liner on my Alberg cracked and folded in on itself....it was paper thin and wasn't made very well at all.

The port or left side of the liner appears to be in better shape but it still isn't anything to brag about. The marks you see are measurement points. I am making a brace that will be epoxied and bolted through the main beam to add strength to the beam structure (more about that in a future post).

After taking a pneumatic disc sander to the area I uncovered many voids and poor layup areas. The G10 board below the main beam is part of my plan to add structural integrity to the existing beam. I am working on a blog post to explain, in detail, my plans for the mast beam reinforcement; but for now just to summarize it: I am going to add an archway that ties the two bulkheads together to help distribute the pressure of the main beam.

More loose and poorly laid up fiberglass on the port side but luckily it didn't extend out nearly as far as the starboard side.  

Another huge void and poor layup on starboard side.

A close up of the void. I will fill this area with thickened epoxy.

I intend to grind out all that loose stuff from the beam area. Once it's cleaned up I will add a few layers of biaxial fiberglass cloth, making a nice smooth surface to begin the repair work.


A short video showing what I discovered in the main beam area and a peek into my Master Plan to add reinforcement to the mast support beam.

Making progress!


Monday, January 25, 2016

Alberg 30 Refit: Mast Step Repair

As mentioned in a recent post my Alberg 30 suffers from mast support compression. This is one major area on which I need to focus. 
I have begun some investigative work to determine the extent of the damage, starting with poking and drilling into the beam area. I was not too happy with some of the results. However, nothing so far seems to be irreparable.

I started by cutting a few lines into the damaged area. I used the oscillating tool for this.

As I was poking into the damaged area I found some very poorly laid up fiberglass. I did not chase this area all the way to its end, but I think it goes at least another 3 or 4 inches toward the starboard bulkhead.

Good news is that this poor fiberglass lay up appears to be only skin deep...literally. My 1971 Alberg 30 is what is known as a "liner" boat...meaning Whitby Boat works created a sort of "beauty" layer (similar to the headliner in a car) to enhance the appearance inside the boat and give it a more finished look. Without this liner you would see the bare fiberglass, which was probably a lot of work for them to clean and make presentable, so the liner simplified the finishing process. The damage so far appears to be a poor lay up of just the liner. 
Next, I drilled a few exploratory holes into the beam itself and I found the aluminum beam that is encased in the fiberglass. That is also good news. I suspected with all the compression that maybe the aluminum beam was a unicorn of sorts. Well, it's no myth; I located it. 

So why did the mast compress the deck? My answer is purely speculation but I believe quite plausible.  I have described my theory in the sequence of photos below:

In this photo you can see the mast step area (the actual mast step is a rectangle pad with 6 holes in it). Those holes are drilled into the deck. Over the years of hard use and poor maintenance, water seeped past those holes and into the balsa core below the mast step. Yes, there is balsa core below the mast step. I believe this was the major cause of the compression. Water got into the core, turned it into rotten mush and most of the integrity was lost.

I set the mast step pieces back on the step itself for this picture. This photo shows what I consider to be a major design flaw. The blue lines drawn on the deck outline where the support beam is in relation to the mast step. You can see it is not centered.  This likely caused some of the excess compression to the rear of the mast support down below. This will be redesigned when put back together.

Another shot of how off center the mast step is compared to the support beam down below. 

With everything all marked I began to cut into the deck. To no one's surprise I found soaking wet rotten core.

Not pretty.

Much to my relief, the rotten core did not extend much further aft than the mast step.

Further destruction.

Ah yes, just what I always wanted to do...cut up my poor sailboat. Ugh.

Area all cut open and lower skin exposed.

A shot from down below looking out.

At the end of the day this is what I cut away. 

This is not the best photo but you can see the compression in the center of the mast step area.  I will build this area back up with solid fiberglass and my favorite G10 board.

I have begun to formulate a plan. My plan will include re-designing and strengthening the mast beam and mast step area from both above and below.
This is a 3-in wide strip of 1/8th inch G10. I will fabricate a laminated beam in this area to assist in the support of the step. 

More on the re-design and strengthening of the mast support to come!


Here is a video I shot the day I cut the mast step open. 

When will I finally be able to stop destroying the boat I so dearly love?

Sunday, January 10, 2016

Jordan Series Drogue in action on an Alberg design

I found this video very interesting and wanted to share. Excellent video of real sea conditions and the effects of running with a Jordan Series Drogue


James Baldwin of Atomvoyages.com conducted this test on his Pearson Triton 28 during a strong Nor'easter this past fall. This boat is very similar to our Alberg 30 in almost every way.  I would assume our Sal would act very similar in the same conditions. We know how our boat acts hove-to but I have often wondered how this device would work. Now we have a very good idea.

Wednesday, January 6, 2016

Alberg 30 Refit: Start of Mast Support Beam Repair & The Big Surprise Revealed!

Winter has finally arrived here in the Mid-Atlantic region of the country. We had a dusting of snow yesterday. The season took longer than usual to arrive but we all knew it was just a matter of time. Even with it finally here, there are still plenty of projects to do while it's cold outside.
Before we get to the winter projects, I'll show you where we are on the side deck:

It's coming along well. It will need one more layer of cloth.

Another angle of the repaired area with initial sanding work.

This is a comparison of the new reinforced/repaired area (left) and old original/half-assed repaired area (right) under the stanchion. Hopefully the difference is noticeable.

Moving onto things that can continue to be repaired when it's chilly outside. My mast support beam area has been a concern since the day I bought my boat. I knew I would fix the area someday. When I did my initial research on the Alberg 30, I learned the differences between the liner (newer) and non-liner (older) models. One of the big differences was the mast support beam. Non-liner boats had a laminated wooden beam that was known to fail. Because of this known issue, there is a plethora of information on how to repair it. As for my 1971 Alberg 30 "liner" boat, the mast support beam is not known as a weak area. It has an aluminum beam encased in the fiberglass deck somewhere. I have not been able to find any documentation on exactly how or where this aluminum beam is placed within the deck. Nor have I been able to find out just how substantial or strong the beam might be. The good news (and one of the reasons I went ahead and bought our Sal anyway) is I couldn't find any documented cases of it failing either. I did find reports that the area tends to suffer from deck compression, and indeed, Sal is no exception to that. Actually, her compression is pretty severe. This condition occurs when water gets into the balsa deck coring under the mast. What I have found on my Alberg is that not only is there a good bit of compression but the beam may be bowed also. So I will investigate further and document what I find, as well as how I plan to repair and make it stronger than new.


Here is a video I posted to show everyone what the compression and mast beam looks like on our Sal.

This is good photo showing the compression of the overhead. You will notice that the coach roof kind of flattens out, and it loses the natural curvature of the deck.  That large crack is in the liner. There could be some damage under it, which I will discover soon. There was so much compression that the liner cracked and folded on itself....for obvious reasons this is not good. 

Another pic showing how the overhead is compressed.

An aluminum plate held up against the bottom of the beam shows the bowing in this area, notice the gap on the left. I am not too sure if the bow is in the liner or the aluminum beam encased in the deck. More stuff to investigate. Additional findings to follow soon. With the colder weather here I will put a bit of heat in the boat and get to my investigative work on the beam area. Hopefully my pics and write up will help fellow Albergers that suffer the same mast beam issues.

NOW for the Surprise!

A *NEW* (TO US ANYWAY) BETA MARINE 20 DIESEL! 

I have been going back and forth about powering our Alberg 30. In a previous post, here, I discussed our options for re-powering. I kinda knew all along that I wanted a diesel but from a budget standpoint it was just not going to happen. That is of course unless you find a nearly new one, with only 170 hrs on it, for about a third of the price of a new one. So here it is in our garage, our new-to-us Beta Marine 20hp Diesel:

It is a bit dirty because it had been sitting in storage waiting to be put to use. The previous owner had to abandon a wooden boat project, and offered up his engine for sale. He bought it used back in 2010, and would start it up twice a year until 2014. 

After sitting for 14 months, she was delivered to us this weekend by the previous owner (huge thank you Sunset). We set the ole girl on the floor and haphazardly set her up to be started. One of my conditions for purchase was to see it run.

It was cold here when we started it, 30 degrees and snow flurries. I am happy to report the Beta 20 started almost right up. After 3 or 4 long cranks to get fuel to her cylinders she happily began chugging away!

Needless to say we are very pleased at our good fortune and will put her to good use.
Thank you again Sunset for holding onto the engine until after the holidays and driving it out to us.

I will work on a more permanent cart for the engine so it can be wheeled around the garage and regularly cranked to run. A video of it running will be coming soon.

Happy New Year Everyone!